Description
Measuring Unit
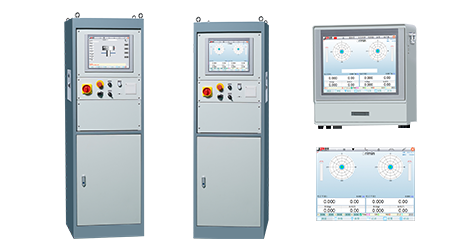
The balancing machine measuring systems produced by Shanghai Jianping Dynamic Balancing Machine Manufacturing Co., Ltd. include JP-800 series, JP-680 series, and JP-580 series. Each of the balancer measurement systems is further divided into vertical cabinets and small electrical boxes. JP-800/680 series is a touch screen operating system, suitable for a variety of models; perfect debugging & balancing, safe operation; friendly HMI, convenient operation.


JP-800 Measuring Unit
JP-800 Measuring Unit
HMI
Linux operating system
Touch-screen operation
-Friendly human-machine interface, convenient and fast operation
Multi-account management
-Has “ Administrator”, “ Inspector” and “Operator” three accounts and passwords.
-According to different roles, user can create different accounts, passwords and permissions, as well as open corresponding functions. Which is very convenient for personnel and equipment management.
Multi-language display
-8 languages selection
-Chinese, English, Arabic, Portuguese, French, Thai, Spanish, Russian are selectable
Visual interface
-The display of measured value is a combination of numbers and vector graphics which can quickly sense the magnitude and angle of unbalance.
-System parameters have prompt information, including parameter definition and setting range. Easy for users to get started.
-Automatically judge whether the rotor is qualified or not, with color hint.
-Flexible calibration methods, the process also has wizard instructions, professional calibration interface is more easy to maintain.
Single-plane, double-plane, three-plane dynamic balancing measurement
-Double-plane dynamic balancing measurement, single-plane static balancing measurement and three-plane balancing measurement are selectable. Can be equipped with auto-positioning, indexing aid and other functions.
Single-plane static balancing measurement
Double-plane dynamic balancing measurement
Three-plane dynamic&static balancing measurement
Rotor parameters
-Formula storage, can store 500 different workpiece parameters, and it is quick and convenient to directly call the corresponding workpiece specifications after workpiece changeover.
Historical records
– There are a variety of recording methods in the settings, which can store 1 million measurement historical data. Historical records can be exported and backed up to the server as well as deleted, and the default is administrator access.
Alarm message
– When the equipment fails, all alarm information can be viewed in the alarm, which is convenient for quick troubleshooting.
Indexing aid
– The indexing aid on the screen vector diagram can display the current angle position of rotor, which is convenient for the user to find the unbalance point(the hardware needs to be configured additionally).
Indexing algorithm
-The main purpose of the balancer measurement system is to prompt the user the angle to add or remove weight. In the actual calibration process, the unbalance amount is often converted into a correctable amount. Some rotors can only be corrected at certain angles, for example, the fan blade can only be added weight on a few blades. If these correctable positions are evenly distributed on the circumference, the indexing algorithm can be selected. The electronic measurement system provides an indexing display algorithm for the operator’s reference while displaying the unbalance amount.
Clamp compensation
– In the process of dynamic balancing, the accuracy of the clamp directly affects the accuracy of the dynamic balancing of the workpiece, so the clamp is required to have high precision, but in the actual processing process, the clamp cannot be absolutely concentric, therefore, by using the clamp compensation function, the influence of the fixture on the dynamic balancing of the workpiece can be reduced within the allowable accuracy.
ISO tolerance calculation
-Used to calculate the unbalance of rotor operation, select the ISO1940 standard which is used for calculating the allowable unbalance, select the corresponding standard, and click the button below to calculate the rotor allowable unbalance, besides, the precision level can be customized too.
Data printing
-Can be connected to the user’s server for printing and backup, as long as the equipment IP address network segment is consistent with the server network segment. User can also use the local printer for dynamic balancing report printing.
Remote assistance
– As long as our company has opened the remote function for your equipment, no matter which country you are located in, you just need to connect the equipment to the network, then we can provide you with remote assistance, fault diagnosis and real-time service.


JP-820 Measuring Unit
Application
JP820 dynamic unbalance measurement system is an electronic measuring system with multiple functions and high measuring accuracy developed by Shanghai Jianping. It can adapt to all kinds of single/double-plane and soft/hard- bearing balancing machines, and can be easily and flexibly connected with various speed sensors and piezoelectric sensors. The system has a wide range of adaptability, high efficiency, strong data versatility, and can output data through standard interface.
Functional Features
1.Rich expansibility
2.Multiple accounts management
3.Multilingual display
4.Intuitive interface, guided operation
5.Vertical/horizontal, single-plane, double-plane, three-plane dynamic & static balancing measurement
6.Record multiple groups of rotor parameters and switch with one key
7.Historical records can be customized and exported
8.Report printing, label printing
9.Remote assistance


JP-580 Measuring Unit
The JP-580 electronic measuring system can be adapted to various single/double-plane and soft/hard-bearing balancing machines, and can be conveniently and flexibly connected to various speed sensors and piezoelectric sensors.
JP-580 electronic measuring unit adopts Advantech industrial host, 17-inch LCD screen, Windows XP operating system, fast running speed, high reliability, strong dustproof and shockproof performance, and can adapt to various industrial environments. The data is highly versatile, and can output data through standard interfaces.
Speed range: 120-12000r/min
Min. resolution: 0.001mg
Min. measurement time: 3s
Measurement dynamic range 1: 100000
– Various Measuring Methods Dynamic balancing, static balancing, support modes up to 10 kinds.
– High measurement accuracy Using a combination of multiple scaling coefficients, automatic adjustment of system sensitivity, no jumping in shifting, double filtering of software and hardware, data compression, and stable measurement.
– DIY Unit Customized unit of unbalance amount and angle for display. A real-time unit conversion is available to meet different customers’ requirements.
– Complete Compensation Electric compensation, flat key compensation, clamp compensation, clamp compensation turning over up to 9 times.
– Technological Algorithm Indexing algorithm, drilling algorithm and crankshaft algorithm.
– Complete Calibration Process Specialized calibration interface provides more convenience for maintenance. Up to 10 calibration stages. Real-time verification for calibration coefficient, also match with linear chart.
– Sensor Disconnection Alarm Automatic diagnosis of sensor disconnection, promptly alarm to avoid false balance of the work piece.
– Multi-language Display language and print report language are available in Chinese, English, Russian etc.
– Convenient Operation The measured value display uses a combination of numbers and vector graphics. All system parameters have prompt information, including parameter definition and setting range. The calibration process is guided.
– Large Storage of Data Database storage. Limitless storage of rotor data and clamp compensation data, and measured records are 10000 cycle records.
– History Automatically record the past measured value, optional methods of recording.
– Excellent Commonness of Files Database files can be opened in Office. Operations like “Find”,“Stats”, “Filter”, “Classify” and “Export” are available via the ancillary database query software.
– Multiple Measuring Report Measuring report, balancing report, single-plane measuring report etc. Note information for rotor data can be added anytime and displayed in the report.
– Multi-balancer Integrated Management (Additional module) A monitoring center can be established to monitor the measurement status of multiple balancing machines in real time, and effectively manage the data.
– Indexing Aid (Additional module) The cursor on the vector can indicate the present angle position of the rotor, convenient for users to find the unbalance point.
CONTACT US
- Opening Hours: Mon-Fri: 8am – 7pm
- Call Us: 0613863344 / 0982769511
- Email Us: mtp@mtppro.com
- LINE ADD: https://lin.ee/vDX2Omh
- FACEBOOK : https://www.facebook.com/mtppro2006
- YOUTUBE : https://www.youtube.com/@mataneepan251


Reviews
There are no reviews yet.